ONLINE SUSTAINABLE LIVING WORKSHOPS !

In an era marked by environmental challenges, the importance of sustainable living has never been more evident. Online sustainable living workshops offer individuals a unique opportunity to learn, engage, and take action towards creating a more sustainable future. In this blog post, we’ll delve into the essence of online sustainable living workshops and how they […]
ONLINE SUSTAINABLE LIVING WORKSHOPS !
Joan-Ramon Laporte, doctor specialized in pharmacology: “Cholesterol is good for the health of older people”

#JoanRamon #Laporte #doctor #specialized #pharmacology #Cholesterol #good #health #older #people The doctor and professor of Pharmacology at the Autonomous University of Barcelona Joan-Ramon Laporte has recently launched the book ‘Chronicle of an Intoxicated Society’, and since the publication of the text he has given interviews in which he argues that the health control has been […]
Joan-Ramon Laporte, doctor specialized in pharmacology: “Cholesterol is good for the health of older people”
Good news for CAF beneficiaries: these allowances will increase on April 1st, discover their new amounts

#Good #news #CAF #beneficiaries #allowances #increase #April #1st #discover #amounts On Monday April 1, 2024, certain social benefits from the Family Allowance Fund will be increased in an attempt to counter the significant inflation currently affecting France. Activity bonus, RSA, family allowances… like every year, in April, social benefits are revalued, announces the government. A […]
Good news for CAF beneficiaries: these allowances will increase on April 1st, discover their new amounts
Rozzy kitchen
Rozzy kitchen
When you were five, what did you want to be when you grew up?
I wanted to be a doctor and a baker
How to make crunchy peanuts
Welcome to my kitchen
Rozzy kitchen @Rozzy kitchen Uyo, Akwa ibom State
Ingredients
- 6 cups flour
- 6 cups peanuts aka groundnut
- 6 eggs
- 1 sachet milk flavour
- 1 table spoon margarine
- 1 tbsp vanilla flavour
- 2 cups sugar
- ¹/² teaspoon of salt
- ¹/² teaspoon of nutmeg
- 1 table spoon baking powder
- Oil for frying
- Cooking Instructions
1
Soak the groundnut inside hot water and add a teaspoon of salt and leave for 30 mins, sieve and dry the groundnuts.
2
Sieve the flour inside a bowl, mix in the baking powder, nutmeg, and milk flavour
3
In a small bowl break the eggs, add vanilla flavour, sugar, salt and butter wisk very well and allow to rest for 10 mins. So the sugar and salt will dissolve
My crunchy peanuts recipe step 3 photo
My crunchy peanuts recipe step 3 photo
4
Put the 6 cups of groundnuts inside a bowl with a round and smooth bottom for easy rolling
5
Take the bowl of groundnut, put 1 tbspoon of the egg mixture inside the bowl and roll in a circular motion, the egg will coat all the groundnuts then you now sprinkle a handful of flour inside and roll in a circular motion and the flour again will coat the groundnut. Repeat the procedure until you exhaust the flour and the egg mixture
6
Your well coated peanuts
My crunchy peanuts recipe step 6 photo
My crunchy peanuts recipe step 6 photo
7
Pour in a tray and allow to set for about 20 mins.
My crunchy peanuts recipe step 7 photo
My crunchy peanuts recipe step 7 photo
8
Deep fry till it’s golden brown
My crunchy peanuts recipe step 8 photo
- Cooking Instructions
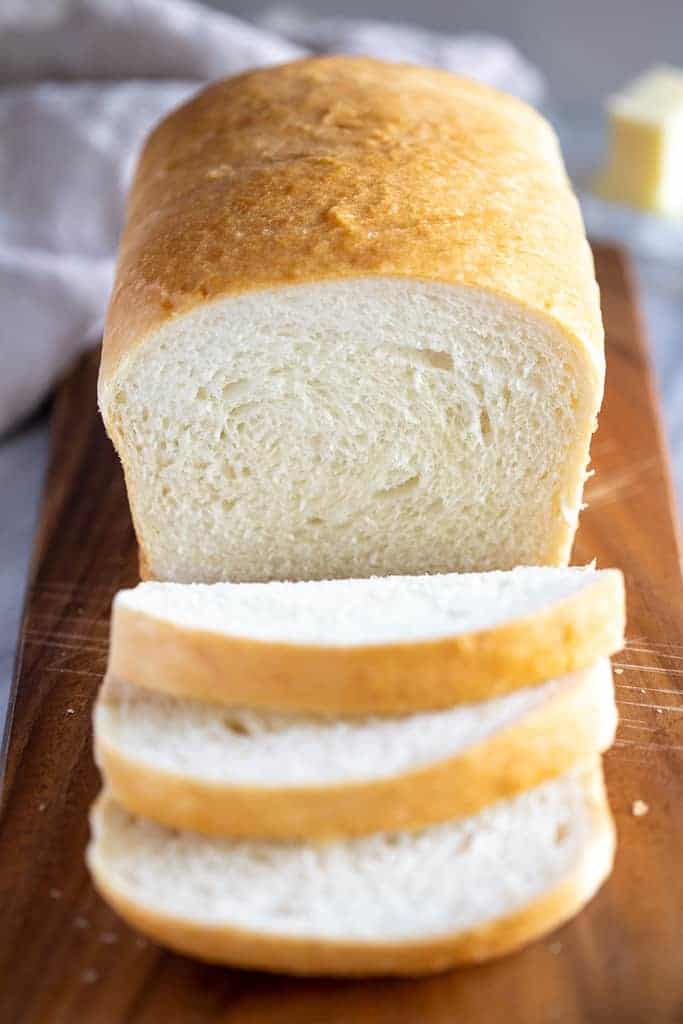
How to bake bread 🥪
Tastes Better From ScratchSearch
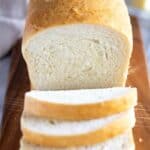
Homemade Bread
LAST UPDATED ON SEPTEMBER 26, 2022• Jump to Recipe
Save Recipe Print Recipe Jump to Video
Look no further for the BEST and simplest homemade Bread recipe made with just six simple pantry ingredients! It’s the perfect white bread for sandwiches and it freezes well too!
Our favorite way to eat freshly baked bread is with homemade strawberry, raspberry, or peach jam. It’s simply heaven.
There are so many things to love about this bread recipe, but if I had to highlight the best parts, it’s that it only requires shelf stable ingredients (no milk, eggs or butter needed!) and it’s EASY and fool-proof to make! Whether you’re a newbie or experienced bread maker, you can’t mess this up, and I know you’re going to love it!
MY LATEST VIDEOS
Cauliflower Salad
0 seconds of 1 minute, 1 second
Ingredients needed:
- Warm water: (105-115 degrees)- to activate the yeast.
- Active Dry yeast: Instant or rapid rise yeast can be substituted, following my adaption notes in the recipe card.
- Granulated sugar or honey: the sugar is used to “feed” the yeast and tenderize the bread.
- Salt: to enhance flavor
- Oil: Vegetable or canola oil, or melted butter could be substituted
- Flour: Bread Flour or All-Purpose Flour can both be used with no changes to the recipe. The exact amount of flour used will vary depending on different factors (altitude/humidity etc.). What matters is the texture of the dough. It should be smooth and pull away from the sides of the bowl. It’s important not to add too much flour or your bread will be dense. The dough should be just slightly sticky when touched with a clean finger.
Pro Tips:
- Use fresh yeast! If your yeast is expired or bad, the bread will not rise properly. We will test it in step 1 of the recipe. Store yeast in the refrigerator to maintain best quality.
- To speed up the bread rise time: Make dough up to first rising, placing it in a well greased bowl, turning it once to grease the dough all over. Cover bowl with plastic wrap. Preheat oven to 180 degrees F, then turn oven off. Place bowl into the oven, leaving the oven door slightly cracked open. Allow to rise until doubled. Then remove, punch down and shape into loaves.
Do I need a Bread Maker or Stand Mixer?
NO! You don’t need any special equipment for this white bread recipe. If you have a stand mixer it makes the process easier, but you can simply use a mixing bowl and wooden spoon, and then knead the dough with your hands. You can use bread machine with this recipe if you have one, but you may need to cut the recipe in half (to make just 1 loaf), depending on your machines capacity.
How to make Bread:
- Proof the yeast: In a large bowl or stand mixer add the yeast, water and a pinch of the sugar or honey. Allow to rest for 5-10 minutes until foaming and bubbly. (This is called “proofing” the yeast, to make sure it is active. If it doesn’t foam, the yeast is no good, and you need to start over with fresh yeast).
- Prepare the dough: Add remaining sugar or honey, salt, oil, and 3 cups of flour. Mix to combine. Add another cup of flour and mix to combine. With the mixer running add more flour, ½ cup at a time, until the dough begins to pull away from the sides of the bowl.
- Knead the dough: Mix the dough for 5 minutes on medium speed (or knead with your hands on a lightly floured surface, for 5-8 minutes). The dough should be smooth and elastic, and slightly stick to a clean finger, but not be overly sticky.
- First Rise: Grease a large bowl with oil or cooking spray and place the dough inside. Cover with a dish towel or plastic wrap and allow to rise in a warm place* until doubled in size (about 1 ½ hours).
5. Punch the dough down really well to remove air bubbles.
6. Divide into two equal portions. Shape each ball into long logs and place into greased loaf pans.
7. Second rise: Spray two pieces of plastic wrap with cooking spray and lay them gently over the pans. Allow dough to rise again for about 45 minutes to one hour, or until risen 1 inch above the loaf pans.
8.Bake: Adjust oven racks to lower/middle position. Preheat the oven to 350 F. Bake bread for about 30-33 minutes, or until golden brown on top. Give the top of a loaf a gentle tap; it should sound hollow.
Invert the baked loaves onto a wire cooling rack. Brush the tops with butter and allow to cool for at least 15 minutes before slicing.
Storing: Once cool, store bread in an airtight container or bag for 2-3 days at room temperature, or up to 5 days in the refrigerator.
Make Ahead And Freezing Instructions:
To make ahead: Make the bread dough through step 4, before the first rise. Place in a large airtight container, and refrigerate for up to one day. Remove from fridge and allow to come to room temperature. Proceed with punching down and forming loaves.
To freeze bread dough: Prepare the recipe through step (6), before the second rise. Place the shaped loaves into a freezer-safe or disposable aluminum bread pan. Cover tightly with a double layer of aluminum foil and freeze for up to 3 months. When ready to bake, allow the loaves to thaw and complete the second rise, at room temperature (about 5 hours). Bake as directed.
To freeze baked bread: Allow baked bread to cool completely. Place each loaf in a freezer-safe resealable bag and freeze for up to 3 months. Thaw at room temperature on the countertop, or overnight in the refrigerator.
Variations:
- Cinnamon swirl bread: After punching dough down and dividing into two pieces (step 7) roll each piece out into a large rectangle. Mix ¼ cup sugar and 2 teaspoons ground cinnamon together. Sprinkle the cinnamon sugar mixture on top, leaving a 1-inch border around the sides. Roll the dough up very tightly into a log. Pinch the ends to seal and place into prepared loaf pans, seam side down. Continue with step 8.
- Raisin Bread – Add 2 cups of raisins to the bread dough in step 3, then follow instructions above for adding cinnamon swirl.
- Rolls
- Breadsticks
- Whole Wheat Bread
- Artisan Bread
- Pizza Dough
Uses for Leftover Bread:
Homemade bread will dry out after 2-3 days, but I have many recipes that use bread slices, including:
- Baked French Toast Casserole
- Bread Pudding
- Classic French Toast
- Bread Crumbs – Allow the bread to dry out completely, then pulse it into crumbs using a food processor or blender.
- Dried Bread Cubes for Stuffing
- Overnight Breakfast Casserole
You can also FOLLOW ME on FACEBOOK, TWITTER, INSTAGRAM and PINTEREST for more great recipes!
Recipe
4.99 from 7640 votes
Homemade Bread
Look no further for the BEST and simplest homemade Bread recipe made with just six simple pantry ingredients! It’s the perfect white bread for sandwiches and it freezes well too!
AUTHORLAUREN ALLEN
COURSEAPPETIZER, SIDE COURSE
CUISINEAMERICAN
SERVINGS24
CALORIES202
PREP 15MINUTES MINS
COOK 30MINUTES MINS
RISE TIME: 3HOURS HRS
TOTAL 3HOURS HRS 45MINUTES MINS

EmailGo
I’d like to receive more tips & recipes from Tastes Better from Scratch.
This site is protected by reCAPTCHA and the Google Privacy Policy and Terms of Service apply.
0 seconds of 3 minutes, 58 seconds
Equipment
null
Ingredients 1x2x3x
- ▢2 cups warm water (105-115 degrees)
- ▢1 Tablespoons active dry yeast*
- ▢1/4 cup honey or sugar
- ▢2 teaspoons salt
- ▢2 Tablespoons oil (canola or vegetable)
- ▢4 – 5 1/2 cups all-purpose or bread flour*
null
Instructions
- Prepare the dough: In a large bowl or stand mixer add the yeast, water and a pinch of the sugar or honey. Allow to rest for 5-10 minutes until foaming and bubbly. (This is called “proofing” the yeast, to make sure it is active. If it doesn’t foam, the yeast is no good, and you need to start over with fresh yeast).
- Add remaining sugar or honey, salt, oil, and 3 cups of flour. Mix to combine.
- Add another cup of flour and mix to combine. With the mixer running add more flour, ½ cup at a time, until the dough begins to pull away from the sides of the bowl. The dough should be smooth and elastic, and slightly stick to a clean finger, but not be overly sticky. Add a little more flour, if needed.
- Knead the dough: Mix the dough for 4-5 minutes on medium speed (or knead with your hands on a lightly floured surface, for 5-8 minutes).
- First Rise: Grease a large bowl with oil or cooking spray and place the dough inside, turning to coat. Cover with a dish towel or plastic wrap and allow to rise in a warm place* until doubled in size, about 1 ½ hours.
- Spray two 9×5” bread pans generously with cooking spray on all sides. (I also like to line the bottom of the pans with a small piece of parchment or wax paper, but this is optional.)
- Punch the dough down well to remove air bubbles. Divide into two equal portions. Shape each ball into long logs and place into greased loaf pans.
- Second rise: Spray two pieces of plastic wrap with cooking spray and lay them gently over the pans. Allow dough to rise again for about 45 minutes to one hour, or until risen about 1 inch above the loaf pans. Gently removing covering.
- Bake: Preheat oven to 350 F. Bake bread for about 30-33 minutes, or until golden brown on top. Give the top of a loaf a gentle tap; it should sound hollow.
- Invert the loaves onto a wire cooling rack. Brush the tops with butter and allow to cool for at least 10 minutes before slicing.
- Once cool, store in an airtight container or bag for 2-3 days at room temperature, or up to 5 days in the refrigerator.
Notes
Flour: Bread flour or all-purpose can both be used with no changes to the recipe. Bread flour will produce a slightly chewier loaf. Whole wheat flour can’t be substituted cup-for-cup because it’s gluten levels are different. Here is my favorite Whole Wheat Bread recipe.
Yeast: to substitute Instant or Rapid Rise yeast, skip the “proofing” of the dough in the first step and add the yeast to the bowl with step 2. Allow the dough to complete its first rise, and then roll and shape into loaves and rise again (rise times will be much faster with instant yeast).
Quick-rise Tip: To speed up the rising time of the first rise, make dough up to first rising, placing it in a well greased bowl, turning it once to grease the dough all over. Cover bowl with plastic wrap. Preheat oven to 180 degrees F, then turn oven off. Place bowl into the oven, leaving the oven door slightly cracked open. Allow to rise until doubled. Then remove, punch down and shape into loaves.
To make ahead: Make the bread dough through step 4, before the first rise. Place in a large airtight container, and refrigerate for up to one day. Remove from fridge and allow to come to room temperature. Proceed with punching down and forming loaves.
Freezing Instructions:
To freeze the dough: Prepare the recipe through step (6), before the second rise. Place the shaped loaves into a freezer-safe or disposable aluminum bread pan. Cover tightly with a double layer of aluminum foil and freeze for up to 3 months. When ready to bake, allow the loaves to thaw and complete the second rise, at room temperature (about 5 hours). Bake as directed.
To freeze baked bread: Allow baked bread to cool completely. Place each loaf in a freezer-safe resealable bag and freeze for up to 3 months. Thaw at room temperature on the countertop, or overnight in the refrigerator.
Bread Machine: If using a bread machine, you may want to cut this recipe in half to make 1 loaf (depending on the capacity of your machine).
Nutrition
Calories: 202kcalCarbohydrates: 41gProtein: 5gFat: 2gSaturated Fat: 1gSodium: 196mgPotassium: 56mgFiber: 1gSugar: 3gCalcium: 8mgIron: 2mg
Did You Make This Recipe?
Tag @TastesBetterFromScratch on Instagram with #TastesBetterFromScratch!
Have you tried this recipe?!
RATE and COMMENT below! I would love to hear your experience.
This post contains affiliate links.
Related Posts
Slow Cooker Chicken Tacos
Air Fryer Meatballs
Pasta Primavera
Spaetzle
Share Recipe
ORIGINAL POST March 21, 2020
UPDATED September 26, 2022
CATEGORIES
ABOUT THE AUTHOR
Lauren Allen
Welcome! I’m Lauren, a mom of four and lover of good food. Here you’ll find easy recipes and weeknight meal ideas made with real ingredients, with step-by-step photos and videos.
LEAVE A COMMENT
Your email address will not be published. Required fields are marked *Recipe Rating
Recipe Rating
Comment *
Name *
Email *
COMMENTS
- Rose Colon
I’ve made this recipe so many times I know it by heart. It’s inexpensive to make and delicious. The only change I made is to increase the salt. - NicoleEasy to make, the whole family loves it!
- Sue
I made this today and it truly is the best recipe ever! So light and fluffy and very easy to make. Thank you for sharing.!!!!!! - Kaitlyn Flores
Ok. So this is probably a great recipe, but not for where I live. I live in an RV with a small oven. And I have a wood stove that makes the house a little warmer than a reg house. it over proofed for the first and second rise… so it didn’t exactly fit in my oven!!! lol. I had to move the rack so low that it burnt the bottom of the loaves.just slightly though. Even when I moved it to the lowest line, it still was too big for my lil oven!! Lmao!! But, the bread itself came out amazing!! Had I have the right temp in my house, and a bigger oven, this would be the best bread I ever made!!Thanks for the recipe! - NancyWonderful recipe!
My bread seemed to sink down a bit and did not look rounded on top. Any suggestions of what may have happened? Oven to hot?
Otherwise, the flavor was wonderful.- Stacy PophamThrilled you enjoyed the flavor! 🍞 If your bread sank and wasn’t rounded on top, it might have been over-proofed before baking, causing it to collapse a bit. Oven temperature can also play a part; too hot an oven might cause it to rise too quickly and then fall. Next time, try letting it proof just until it’s doubled in size but not beyond, and check that your oven is at the right temperature.
- Dona
I have just made your bread recipe and it came out amazingly, I will be doing it again and may evan try the brown bread recipe too 😋 👍🏾 - Isabelle Crawford
I was making bread for the first time as a 20 year old mom and 2 and let me just say this recipe is so good and easy to follow. I can’t wait to try your whole wheat recipe next. Thank you for making it simple and a fun experience for me. - Brent Nothnagel
Hey Lauren
Instead of baking a loaf of bread using your recipe, I broke the dough down into 56g quantities and baked 6 cheese buns and six burger buns. Regrettably your allowable star rating is only 5.
My rating for this recipe : ☆ x 495! 😁❤
AS SEEN ON
© 2024 Tastes Better From Scratch — Privacy Policy and Disclosure
null
A RAPTIVE PARTNER SITE
